YOLO로 Human detector 구성하기.
yolo로 많은 사람 탐색하기.
YOLO로 Human detector 구성하기.
YOLO를 사용해보자.
진행하고 있는 프로젝트에서 하나의 이미지나 동영상의 scene에서 다수의 사람을 찾아서 정보를 처리해야할 일이 생겼다. 기존에 사용하고 있던 detectron이나 YOLO의 기본 세팅으로는 한 이미지에서 2명에서 최대 20명 정도가 찾을 수 있었는데, 이제는 최소 50명 최대 100명 가량을 찾아야 한다.
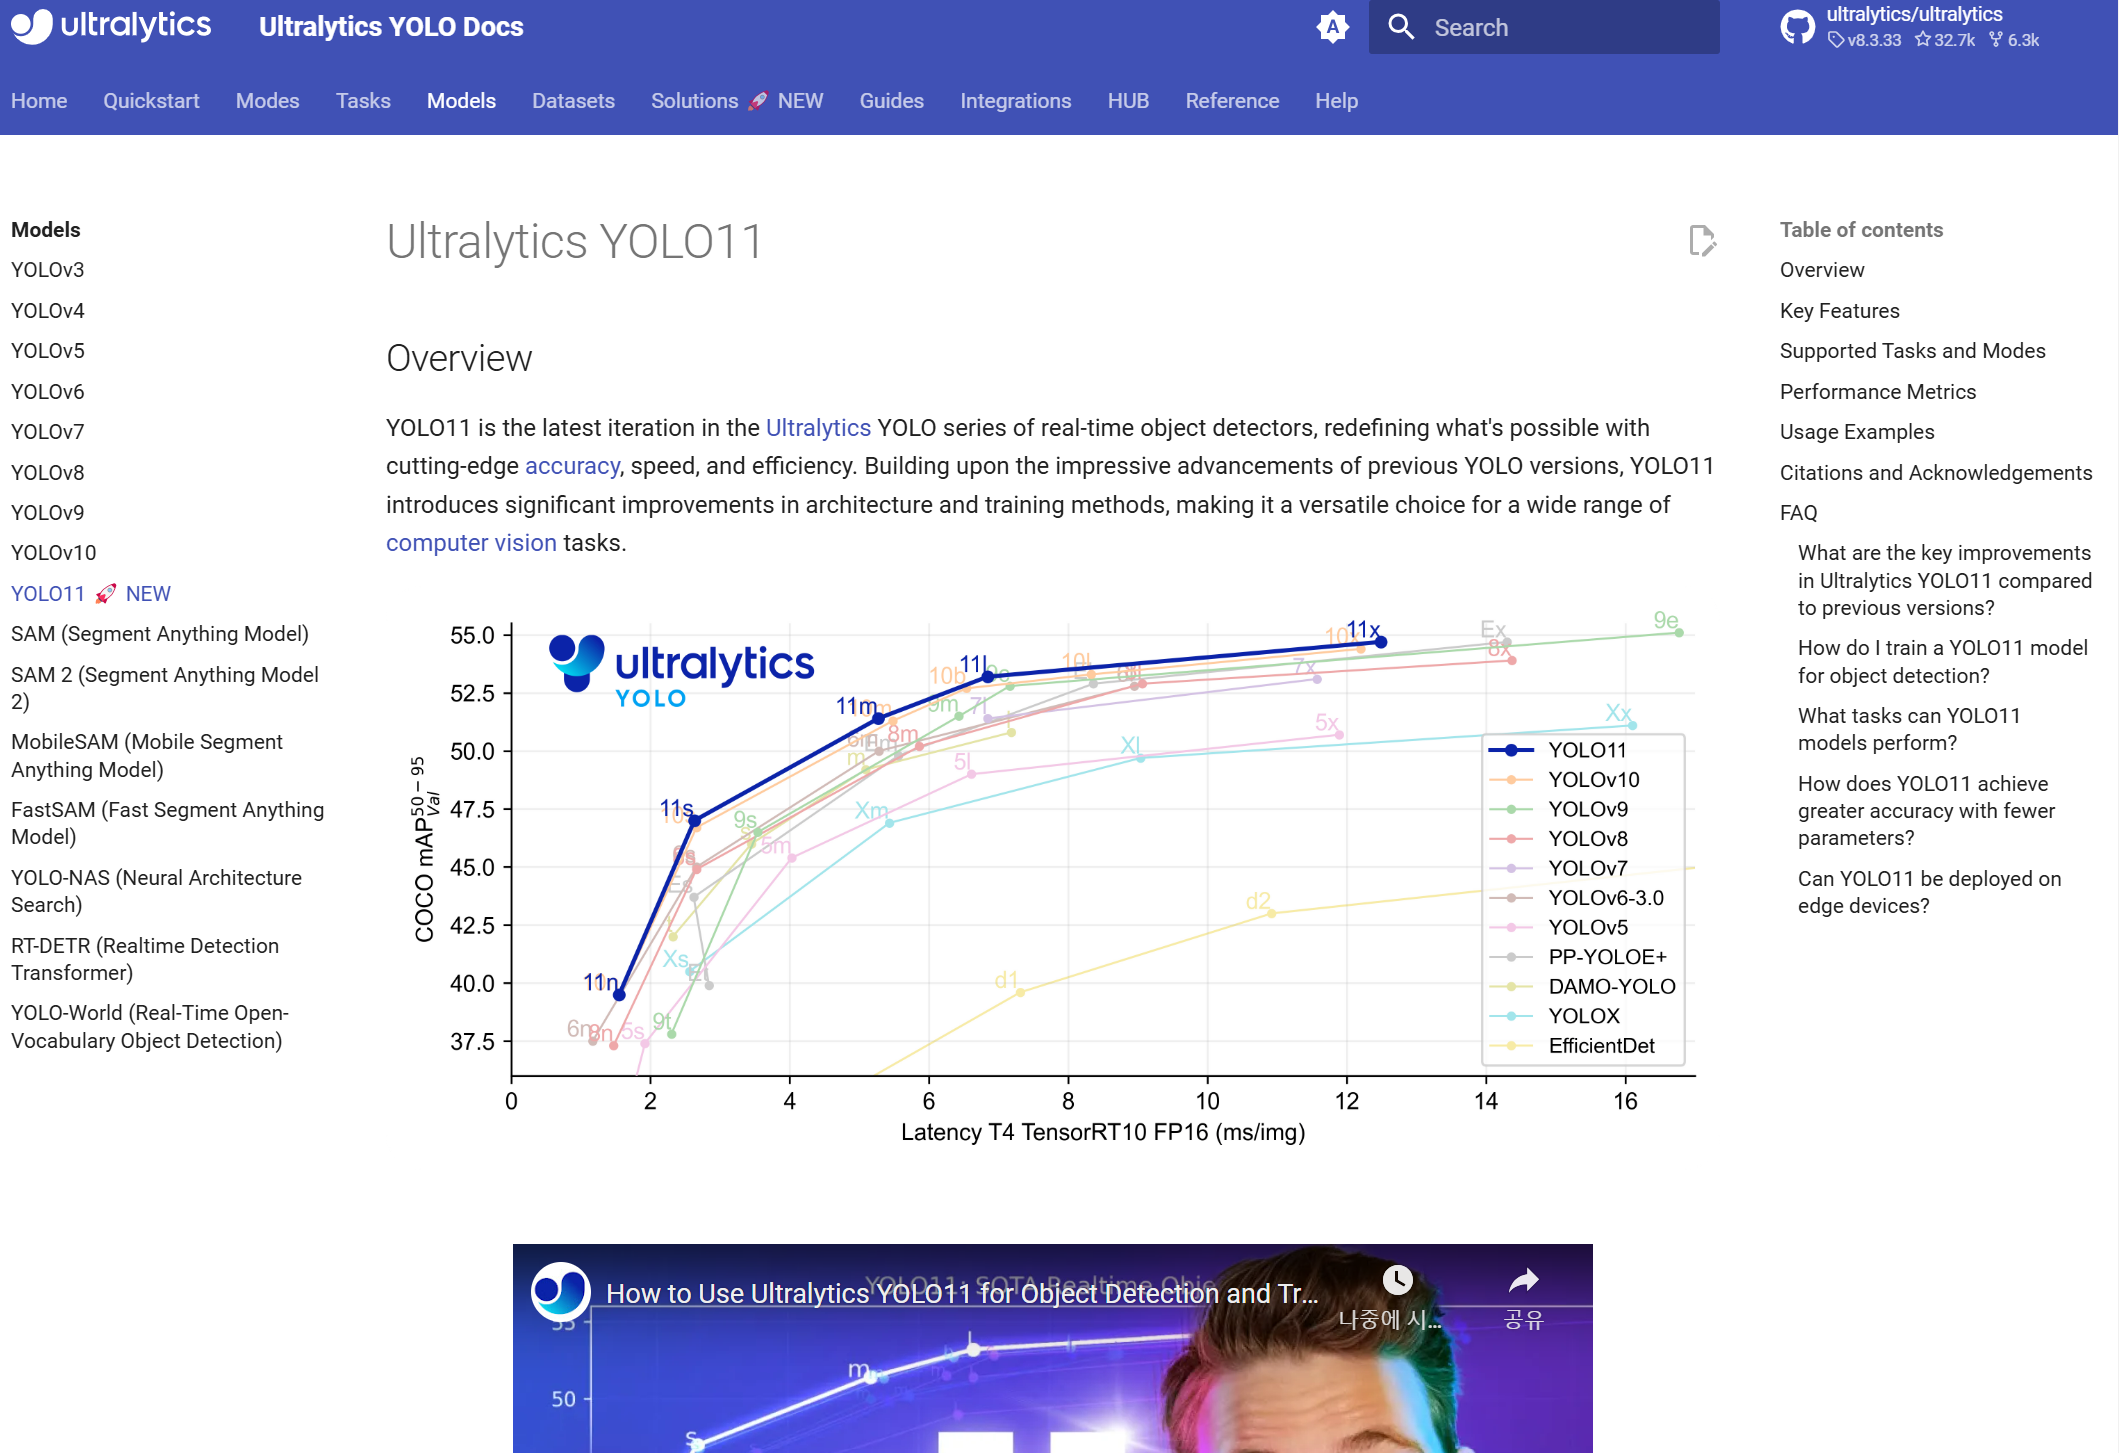
YOLO 공식 홈페이지의 예시를 참고한다.
1
2
3
4
5
6
7
from ultralytics import YOLO

# Load a model
model = YOLO("yolo11n.pt")  # load an official model

# Predict with the model
results = model("https://ultralytics.com/images/bus.jpg")  # predict on an image
nano model을 가져와서 결과를 출력하는 코드이다.
results라는 결과를 print 해보면, 예측에 걸리는 시간, 검출된 객체에 대한 class 정보, bbox 정보 등이 캡슐화되어 출력된다.
1
2
3
4
5
6
7
8
9
10
11
12
13
14
15
16
17
18
19
20
21
22
23
24
25
26
def human_detector(self):
    bboxes = []
    # model load.
    results = self.model.predict(self.image, conf=0.01)

    # detect only human : cls only 0
    for result in results:

        # print(type(result.boxes.cls))   # <class 'torch.Tensor'>

        cls_array = result.boxes.cls.cpu().numpy()

        # cls 가 0인 인덱스 가져오기
        human_indices = np.where(cls_array == 0)[0] # type : ndarray

        if len(human_indices) > 0:
            # cls가 0인 boxes만 선택하여 추가.
            human_boxes = result.boxes[human_indices].xyxy.cpu().numpy()
            bboxes.append(human_boxes)
            print(f'Number of detected persons : {len(bboxes[0])}')

            if self.draw:
                img = Image.open(self.image).convert("RGB")
                self.draw_bbox(img, human_boxes, output_dir=self.output_dir)

    return bboxes
전체 코드
cls_array == 0, 즉 사람 0으로 매핑되어 있스 사람 클래스를 갖고 있는 index만 취해서 bbox 정보를 가져와서 한 이미지에서 검출된 bboxes 뭉치를 가져올 수 있게 됨.
입력 이미지에 bbox정보를 넣어 박스를 그려주는 코드를 추가하여 마무리한다.
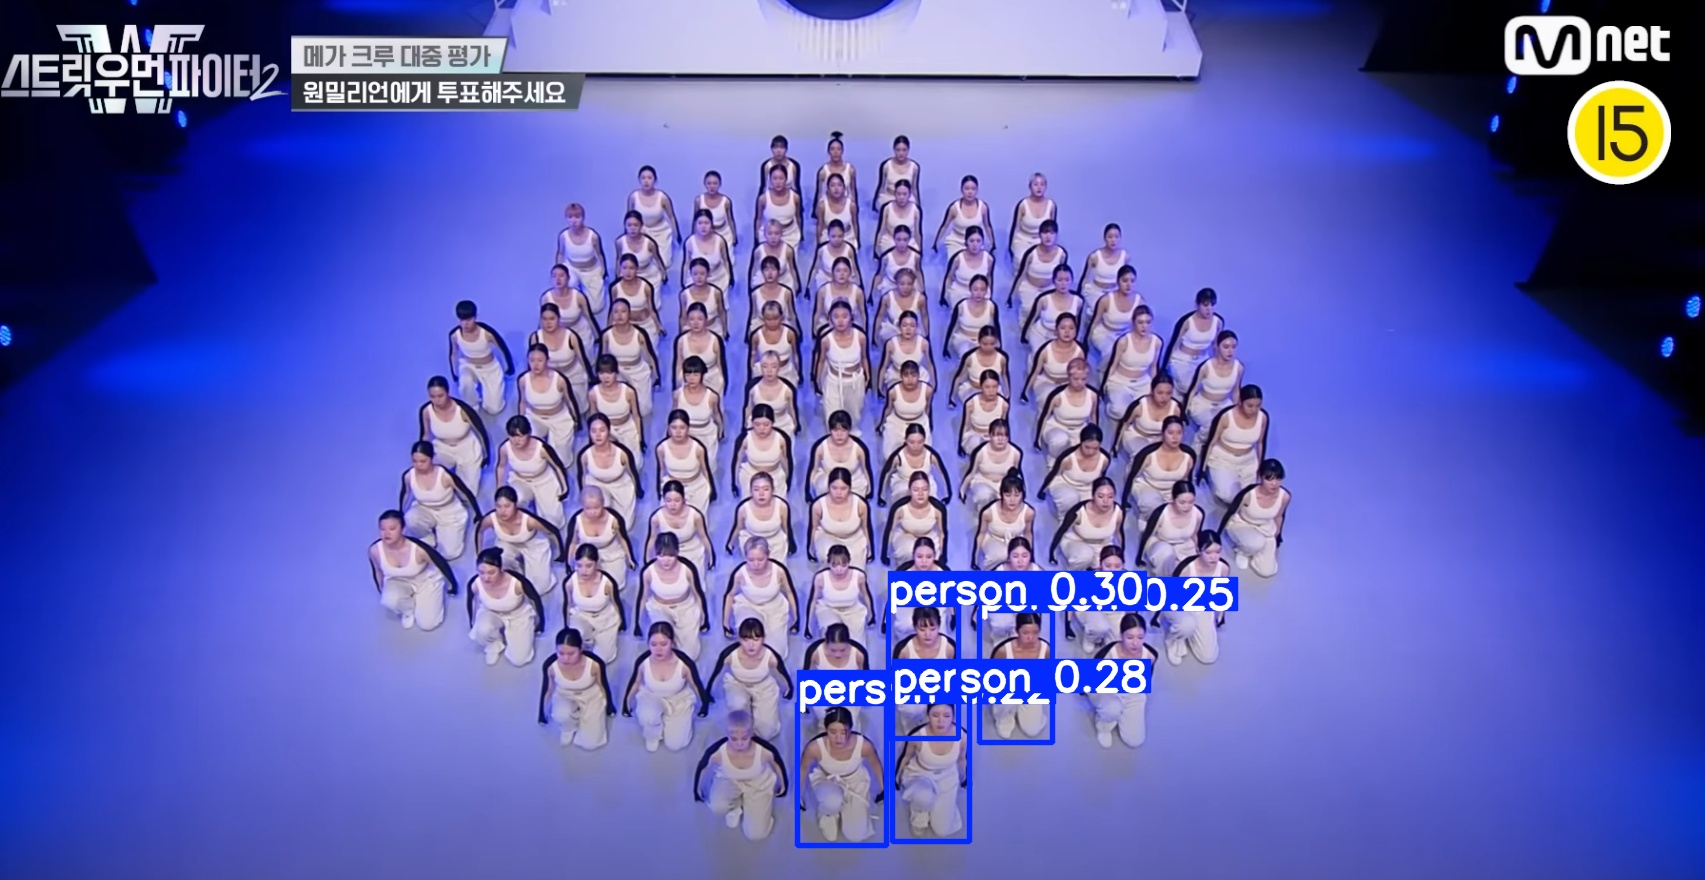
confidence는 기본 세팅인 0.25의 경우 3명 정도 밖에 검출하지 못했다. 또한, nano모델이 아니라 가장 무거운 x모델을 사용했고 confidence는 0.01로 극한으로 낮췄다.
1
2
3
4
5
6
7
8
9
10
11
12
13
14
15
16
17
18
19
20
21
22
23
24
25
26
27
28
29
30
31
32
33
34
35
36
37
38
39
40
41
42
43
44
45
46
47
48
49
50
51
52
53
54
55
56
57
58
59
60
61
62
63
64
65
66
67
68
69
70
71
72
73
74
75
import numpy as np
from ultralytics import YOLO
from PIL import Image, ImageDraw
from ultralytics.utils import LOGGER

import argparse
import os

class Human_detector:
    def __init__(self, model, image, output_dir, draw=True):
        # initialize
        self.model = model
        self.image = image
        self.output_dir = output_dir
        self.draw = draw


    def draw_bbox(self, img, bbox, output_dir):
        # 이미지, 비박스 입력으로 받아서 그리고 출력경로에 저장한다.
        draw = ImageDraw.Draw(img)
        # 비박스 두께 색깔 텍스트를 표기한다.
        for box in bbox:
            xyxy = box[:4]
            draw.rectangle(xy   xy, outline="red", width=2)
            draw.text((xyxy[0], xyxy[1] - 10), "Person", fill="green")

        # 결과 저장
        output_path = os.path.join(output_dir, "result.png")
        img.save(output_path)
        print(f"saved image with bbox to {output_path}")

    def human_detector(self):
        bboxes = []
        # model load.
        results = self.model.predict(self.image, conf=0.01)

        # detect only human : cls only 0
        for result in results:

            # print(type(result.boxes.cls))   # <class 'torch.Tensor'>

            cls_array = result.boxes.cls.cpu().numpy()

            # cls 가 0인 인덱스 가져오기
            human_indices = np.where(cls_array == 0)[0] # type : ndarray

            if len(human_indices) > 0:
                # cls가 0인 boxes만 선택하여 추가.
                human_boxes = result.boxes[human_indices].xyxy.cpu().numpy()
                bboxes.append(human_boxes)
                print(f'Number of detected persons : {len(bboxes[0])}')

                if self.draw:
                    img = Image.open(self.image).convert("RGB")
                    self.draw_bbox(img, human_boxes, output_dir=self.output_dir)

        return bboxes

# 로그 레벨 설정(ERROR만 출력)
LOGGER.setLevel("ERROR")

# Load a pretrained YOLO model (recommended for training)
model = YOLO("yolo11x.pt")
# Load image
image_path = "/workspace/detector/ultralytics/multi_person.png"

# save_dir
output_dir = "/workspace/detector/ultralytics/runs/detect"

# Initialize detector
detector = Human_detector(model, image_path, output_dir)

bboxes = detector.human_detector()

print(bboxes)
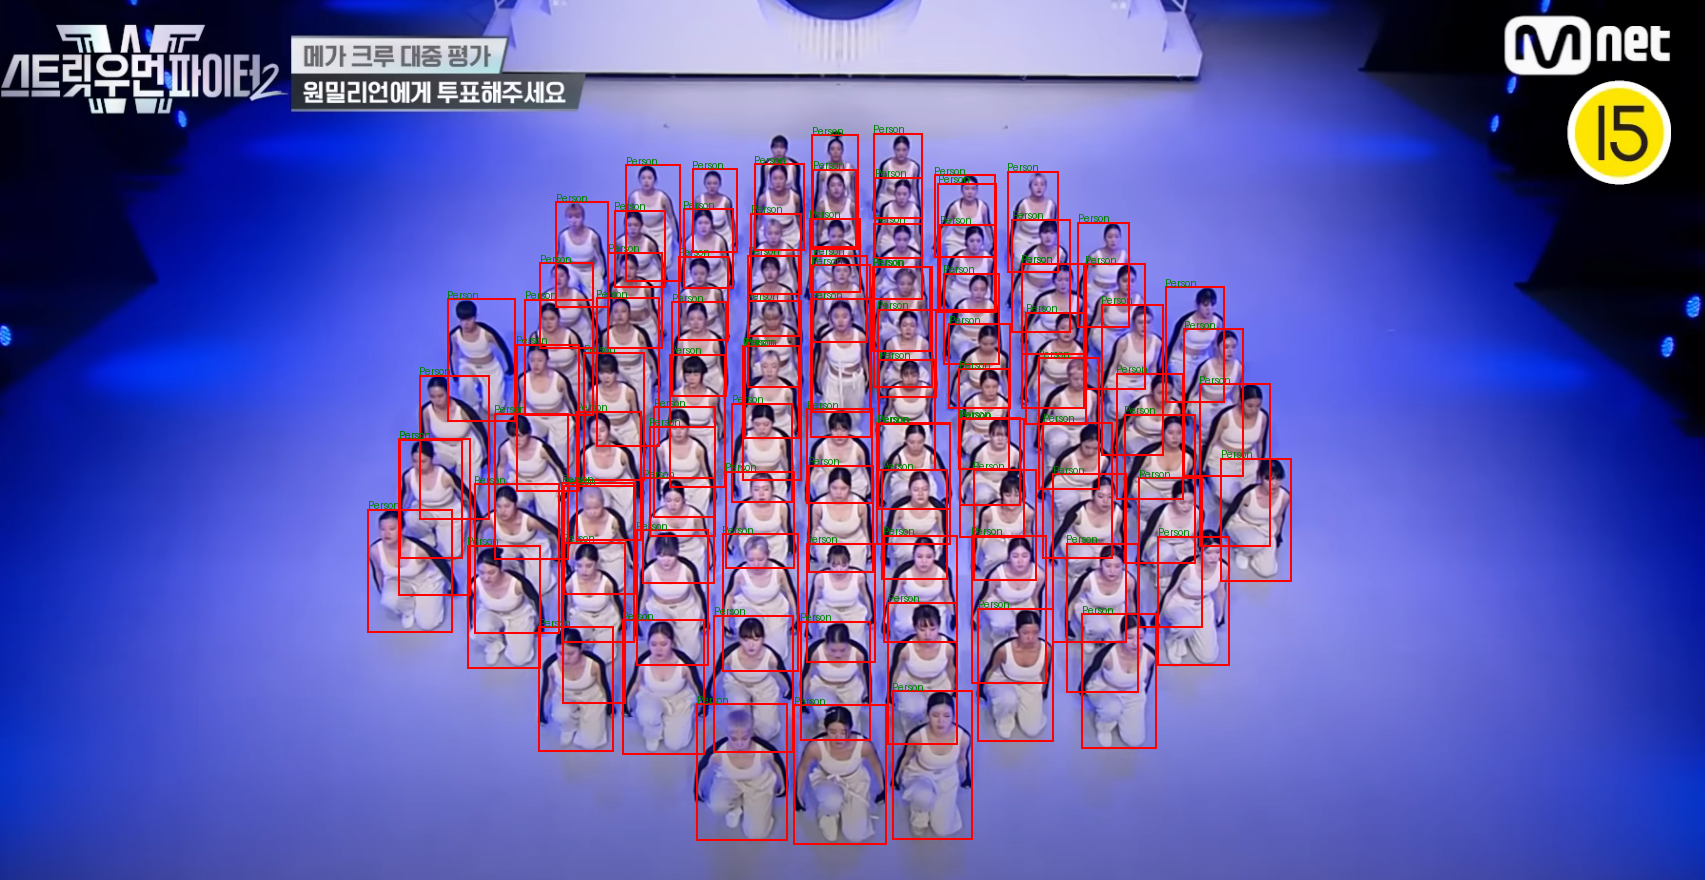
결과
그 결과, 아래와 같이 99명을 캐치하는 출력 결과를 낼 수 있었다.
1
2
3
4
    - **Number of Detected Persons**: 99
    - **Saved Image Path**: `/workspace/detector/ultralytics/runs/detect/result.png`
    - `Person 1`: [793.58, 704.82, 886.63, 844.01]
    - `Person 2`: [892.36, 690.78, 972.53, 839.17]
This post is licensed under CC BY 4.0 by the author.